This is my first independent business venture, and one of the reasons I've been so quiet this week. It is small, and for a very niche market, but I would appreciate it if you would take a look and let me know what you think.
Lyman II Parts Run
If I had quoted it for the shop, it would have been five to ten times more expensive. I know I can make the parts, but I must confess a little worry that I've missed something and will lose my shirt. Logically, I know the worst would be that I would have to refund any money sent, but logic doesn't dispel a little queasiness born of uncertainty. I guess the best way to deal is to just get back to programming.
EDIT: Due to lack of interest, I have scaled back the campaign. I am now only offering the electronic files.
Sunday, April 7, 2013
Friday, April 5, 2013
How do you spot a Machinist?
He/she says "This aluminum cuts like butter!"
You could also look for the bags under the eyes, haggard look, and vacant stare. It has been a long week. The new hire scrapped a couple of parts misloading what should have been as foolproof setup. Of course, after the fact I think if three ways I could have reduced the risk, not including handing him a broom. The hydraulic pump on the Haas is still acting up, but we are keeping it going with a lot of phone help from one of their technicians. I have been too busy with quoting, programming, and actually milling to think much about the CAD/CAM tips I promised for this blog, but hang in there. I'll get there soon.
You could also look for the bags under the eyes, haggard look, and vacant stare. It has been a long week. The new hire scrapped a couple of parts misloading what should have been as foolproof setup. Of course, after the fact I think if three ways I could have reduced the risk, not including handing him a broom. The hydraulic pump on the Haas is still acting up, but we are keeping it going with a lot of phone help from one of their technicians. I have been too busy with quoting, programming, and actually milling to think much about the CAD/CAM tips I promised for this blog, but hang in there. I'll get there soon.
Sunday, March 31, 2013
New Google + Community : CAD/CAM and Machining
CAD/CAM and Machining
A place for us to share and talk without the foolishness of FaceBook. Invite your friends, coworkers, and possibly an engineer or two, provided that they're cool...
A place for us to share and talk without the foolishness of FaceBook. Invite your friends, coworkers, and possibly an engineer or two, provided that they're cool...
Wednesday, March 27, 2013
Thread Milling vs Turning
Spent today dealing with a bad hydraulic pump on our HAAS lathe, a new hire, and a tricky optics part.
The pump had been tripping the breaker on and off for months, but you know how there is never enough time for maintenance until it's too late. The new hire is a retired Marine who has some toolmaking experience, and showed up early and ready to work. Unfortunately, he was scheduled to run the HAAS, making parts for our sister shop. We got him going on a simple mill job, deburring and polishing once the parts had run.
The optics part has a .800 bore thru, a rectangular profile, .9-40 id threads, and 1.062-40 od threads on the boss.

The programmer before, being more a lathe guy, planned to mill the rectangular profile, finish the thru bore, and rough the boss. Then mounting the block on an expansion collet and turning the OD and ID threads.
Of course, coming from a mill background, and already having it set up in a vise, I decided to go with a threadmill. There was also the matter of having a lathe down, and an eager customer paying an expedite fee.
The one I used had a 1/4" shank and a 3/8 cutting diameter. While it has five flutes, it cuts only one thread at a time. I like the threadmills that have the form of the thread ground into the tool, but I can use this style for any pitch, and regrind it when it dulls. This one had already been ground nearly to the end of it's usefulness.
While I used FeatureCAM to generate my program, the code for threadmilling is surprisingly simple.
For OD climb milling where XY zero is center of part:
G00 X-1. Y-.2
Z.1
G01 Z.025 F10. (ONE PITCH ABOVE PART )
G41 D33 X-.875 Y0.(X = MINOR DIA OF THREAD + RADIUS OF CUTTER)
G91 (RELATIVE MOTION)
G02 I.875 Z-.025 L8 (L IS NUMBER OF REPETITIONS)
(IF MACHINE DOES NOT RECOGNIZE L, COPY AND PASTE G02 LINE 7 TIMES)
G02 I .875 (OPTIONAL, WILL MAKE GROOVE AT BASE OF THREAD)
G90G40 X-1.(ABSOLUTE MOTION, CANCEL OFFSET)
G0 Z.1
I needed a thread relief groove deeper that the threadmill could provide, so I did a simple interpolation with a dovetail cutter, between the rough and finish pass.
The pump had been tripping the breaker on and off for months, but you know how there is never enough time for maintenance until it's too late. The new hire is a retired Marine who has some toolmaking experience, and showed up early and ready to work. Unfortunately, he was scheduled to run the HAAS, making parts for our sister shop. We got him going on a simple mill job, deburring and polishing once the parts had run.
The optics part has a .800 bore thru, a rectangular profile, .9-40 id threads, and 1.062-40 od threads on the boss.
Of course, coming from a mill background, and already having it set up in a vise, I decided to go with a threadmill. There was also the matter of having a lathe down, and an eager customer paying an expedite fee.
The one I used had a 1/4" shank and a 3/8 cutting diameter. While it has five flutes, it cuts only one thread at a time. I like the threadmills that have the form of the thread ground into the tool, but I can use this style for any pitch, and regrind it when it dulls. This one had already been ground nearly to the end of it's usefulness.
While I used FeatureCAM to generate my program, the code for threadmilling is surprisingly simple.
For OD climb milling where XY zero is center of part:
G00 X-1. Y-.2
Z.1
G01 Z.025 F10. (ONE PITCH ABOVE PART )
G41 D33 X-.875 Y0.(X = MINOR DIA OF THREAD + RADIUS OF CUTTER)
G91 (RELATIVE MOTION)
G02 I.875 Z-.025 L8 (L IS NUMBER OF REPETITIONS)
(IF MACHINE DOES NOT RECOGNIZE L, COPY AND PASTE G02 LINE 7 TIMES)
G02 I .875 (OPTIONAL, WILL MAKE GROOVE AT BASE OF THREAD)
G90G40 X-1.(ABSOLUTE MOTION, CANCEL OFFSET)
G0 Z.1
I needed a thread relief groove deeper that the threadmill could provide, so I did a simple interpolation with a dovetail cutter, between the rough and finish pass.
Monday, March 25, 2013
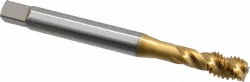
Of Taps and Chips
Whenever I have a chance, I still enjoy just watching the chips fly. Or, as with tapping, the chips spiraling out of a hole in a perfect helix.
This is a tap from one of my favorite jobs. It's an OSG 3/8-16 with thru coolant.
As mentioned in an earlier post, my first job in the trade was running a large Mazak vertical mill. My favorite job used all of its power and versatility.
This is a 304 SS 6-way cube from the Kurt J Lesker Co. They are used to connect vacuum tubes and for mounting equipment. From memory, this one measures 6" on a side.
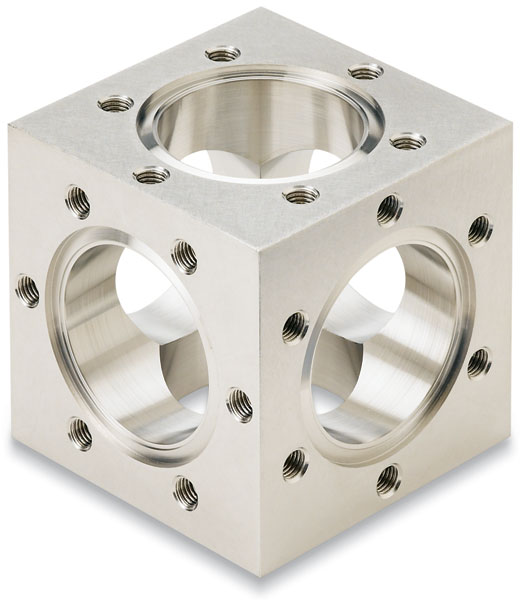
The blanks for the 10" cubes would come in close to 11", with a six inch core taken out of one axis. I had to use a jib boom and winch to get one up onto the table. Once clamped in a vise I would mill a rough pass around the top of the profile, then face and finish the bore to 8" diameter and about 4 inches deep. The steps inside the counter-bores are knife edges, when another component is bolted on a copper seal is placed in between and the knife edges dig into the soft copper forming a positive seal. Once the inside was done, the bolt pattern is drilled. The above cube has six 5/16-24 holes tapped about .625 deep. The 10" needed 12 3/8-16 per face. We had some trouble with with the OSG drills at first, but once we realized that they ran at 45 sfm we were off. Now comes the tapping. Using the Mazak's thru coolant and rigid tapping cycle, I would tap these holes on 10-12 parts without fear of breakage. Can't remember the spindle speed but probably 60 to 100 rpm.
Next I would bolt the finished face to a 4th axis and repeat the process for each face, but adding an insert drill and 1 1/4" hogging end mills to open up the bores. The facing of the part would be done with 6" shell mills (Iscar?) with round inserts for roughing and octogonal for finishing. Full engagement, .120 depth of cut, no coolant. more than a decade later I still have some of the chips in my battered Kennedy toolbox.
 |
| Notice the golden color, hot enough to carry away the heat but not the blue of burning. |
Back to the vise, repeat for final face. Be careful to put it in the correct orientation, notice how the holes have to be offset or they will interfere with each other.
When done, the cube weighs 15 to 20 pounds about a quarter of the blanks weight(if memory serves).
Anyone else have a tool they just can't part with? Or am I just being overly sentimental?
Ps. I finally wised up and enabled comments!
Sunday, March 24, 2013
Troubleshooting a FeatureCAM Dongle / PAF issue
Here is the text from a post on CNCzone:
"None of my FeatureCam versions see either of my Dongles. I was messing around trying to load Ez-Cam 6.21 on an XP machine (stupid idea) and I think I inadvertently loaded the Ez-Cam Sentinel files on the pc corrupting all Sentinel files for FeatureCam. What are my chances for curing this problem short of un-install "ALL" versions then reloading them all again.
Thanks in advance for any help."
In my experience, the anti-piracy measures almost never work the first time installing. This may be more operator error on my part, but in situations like the one above, knowing how to re-install may save hours of delay while trying to contact customer support. A similar process may work for any dongle secured software, but your mileage may vary.
Assuming you have a clean copy of you PAF, you should be able to delete the old one,(C:\dcam\config\pass\*.paf.)
Then go to "Add or Remove Programs" in Control Panel and remove the two Sentinel programs.
After that is done put your clean copy (should be in an e-mail from Delcam) of the .paf file in the pass directory.
Start featurecam, then install dongle when prompted. Odds are this will fail, and you will have to run the PAFwizard.
use "Check dongle" then "Check PAF"
There are links to the manual and drivers for the Sentinel dongle on my documentation page if you want to dig deeper, they have tools that may help more than the PAFwizard that comes with FeatureCAM
Saturday, March 23, 2013
Learning and Teaching
In the beginning…
CNC code always looked like a jumble of letters and numbers flowing past as I watched the digital readout of the large Mazak mill I setup and operated in my first machine shop. I understood the concept, but had no time to learn the ins and outs while making one or two of each part that crossed my bench. Besides, what was the boss paying Tom the programmer for, if not to wrangle all those bits into a process? My concerns were workholding, tooling, coolant, and chip removal. The night shift guy, Bill, had told me not to push the start button unless I knew what the machine was going to do next and taught me to recognize rapid and feed moves, coolant controls, and other basics, but “CircInterp” was as mysterious a word as “quantum entanglement“. While I could use a CAD program from my days making crude computer animations, the CAM side was something I had to rarely got to practice.
Three years later I left that shop with a much better understanding of the fundamentals. I could edit a program to optimize feeds and speeds or change a hole location. I was also picking up “Conversational Programming”, where the machine asks what feature you need, then asks about dimensions and tools to create it. This works well for simple shapes and hole patterns, but is not very flexible and not all machines have this capability.
After moving to the other side of the country, I started at my first production shop. After an hour and a half interview, mostly consisting of me listening to the floor manager’s progressive plans, I was eager to show what I could do. I’ve never had a problem admitting that I didn’t know something, which was good, because nearly everything was new to me. The company hired experienced guys like me to do setups, then hand off to an operator who was qualified to load the parts, and perform basic inspection through the shift. That left the setup guys (and full-blooded Navajo woman) to move on to the next machine and the next part. There were many special tools and fixtures, and every machine had its own quirks too. After a year or so, I was in my element! The variety always kept me engaged, and I had doubled my skills. I began to teach some of the operators piecemeal, but there was never time to do a thorough job.
During my current job I was able to pick up the basics of a CAD/CAM program called FeatureCAM. After our programmer left for a new job, I have moved into his position. As I begin a new phase of my career, I want to document it so others can follow in my footsteps.
I plan to post many things here: programming tips, tool reviews, shop management strategies, and my own observations about the industry.
I welcome your comments and questions.
Dave
Subscribe to:
Posts (Atom)